The Classic Low Center
Introduction: Why Physics is Better Hands-On
Physics can feel abstract when confined to textbooks. However, a simple physics experiment can turn complex theories into tangible “aha!” moments. One of the most engaging topics is the The Classic Low Center—the balancing point where an object’s mass is evenly distributed.
In this guide, you’ll learn The Classic Low Center that visually demonstrates how lowering the center of gravity creates stable equilibrium. The best part? You can do it in 10 minutes using items from your kitchen.
The Science Behind the Experiment
Before diving into the steps, let’s understand the core concept.
What is the Center of Gravity?
It is the average location of the weight of an object. For a symmetrical object like a ruler, it’s at the exact midpoint. For irregular shapes, it shifts toward the heavier side.
What is Stable Equilibrium?
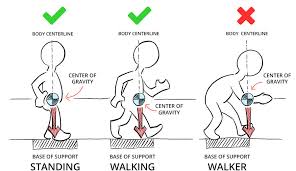
An object is in stable equilibrium if, when slightly disturbed, it returns to its original position. This happens when its center of gravity is low and directly above its base of support.
Pro Tip for SEO: The lower the center of gravity, the more stable the object. This principle is why race cars are built low to the ground and why you widen your stance when carrying heavy boxes.
The “Balancing Nail” Experiment
This experiment seems impossible at first glance: Can you balance several nails on the head of a single nail? Yes—by manipulating The Classic Low Center.
Materials Needed (All under $5)
-
1 hammer (or a block of wood with a nail driven halfway)
-
1 long nail (about 3-4 inches)
-
6 to 8 smaller nails (identical in size and weight)
-
2 wooden rulers or plastic forks (optional alternative)
Step-by-Step Instructions
Step 1: Build the Base
Drive the long nail halfway into the hammer handle (or wooden block) so the head stands up vertically. This will be your pivot point.
Step 2: Create the “Floating” Structure
Take one small nail. Lay it flat on a table. Now, take 5 other small nails and carefully lay them flat on top of the first nail, alternating heads so all the nail shafts point in alternating directions.
Step 3: The Locking Nail
Take the final small nail. Lay it on top of the pile, but in the opposite direction of the bottom nail. Carefully weave it so it passes over the heads of the middle nails and under the head of the bottom nail.
Step 4: The Lift
Carefully lift the entire assembly by holding the locking nail. The structure should hold together like a “steel porcupine.”
Step 5: The Balancing Act
Gently lower the cluster of nails so that the head of the bottom nail rests on the head of the long nail driven into the hammer.
Result: The entire cluster of nails will balance perfectly on a single point!
Why Does This Work? (The Physics Explanation)
If you tried to balance one nail on another, it would fall immediately. So how can 7 nails balance?
-
Shifting the Center of Gravity: The interlocking structure shifts the system’s total center of gravity below the top of the supporting nail.
-
Creating a Pendulum Effect: When the center of gravity is lower than the pivot point (the tip of the standing nail), the system acts like a pendulum. Any tilt raises the center of gravity. Gravity then pulls it back down to the lowest possible point, creating stable equilibrium.
Real-World Applications:
-
Funambulists (Tightrope walkers): They use a long, heavy pole to lower their center of gravity below the rope.
-
Automotive Design: SUVs have a higher rollover risk because their center of gravity is higher than sports cars.
-
Building Skyscrapers: Architects place heavy materials (like concrete) in lower floors to stabilize buildings against wind.
SEO Tips for Sharing Your Experiment The Classic Low Center
If you are a teacher or a science blogger, here is how to optimize this content:
-
Use “How-to” Schema Markup: Add structured data to help Google feature your experiment in rich snippets.
-
Embed a Short Video: A 30-second TikTok or YouTube Short showing the balancing act will reduce bounce rate.
-
Internal Linking: Link to other experiments, such as “Density Tower Experiment” or “Newton’s Third Law Rocket.”
-
Optimize for Voice Search: Include questions like “What is a good physics experiment for high school?” or “How do you demonstrate center of gravity at home?”
Conclusion: Experiment, Learn, Share The Classic Low Center
This center of gravity physics experiment proves that you don’t need a lab to understand fundamental physics. With just a handful of nails, you have demonstrated the principle of stable equilibrium—a concept that keeps planes in the air and buildings upright.
Try it yourself, then challenge a friend. Can they balance the nails? The physics says yes, but the hands-on practice makes it unforgettable.
Frequently Asked Questions (FAQ)
Q: Is this experiment safe for children?
A: Yes, with adult supervision. The nails are sharp, so handle carefully. An alternative is using plastic forks and a toothpick.
Q: Why isn’t my nail cluster balancing The Classic Low Center?
A: Ensure all nails are identical in weight. Also, the locking nail must be woven precisely—too loose, and the center of gravity shifts too high.
Q: Can this be used for a science fair project?
A: Absolutely. You can add variables by using different sized nails or measuring how far it can tilt before falling The Classic Low Center.
Call to Action: Did you master the balancing nail trick? Share your photos in the comments below or subscribe to our newsletter for more weekly DIY physics experiment ideas